Therapy Session
ArmeoPower Quick Reference Guide: Patient Setup
 ArmeoPower Quick Reference Guide
 Andago Quick Reference Guide
ArmeoSpring Quick Reference Guide: Patient Setup
How Should I Optimize the Fall Limit for Andago Training?
Definition
At its core, the fall limit is a way to customize the training for your patient. During gait, balance and step-up exercises, the patient’s center of mass moves vertically and with the fall limit you can adjust the allowable range of vertical displacement.
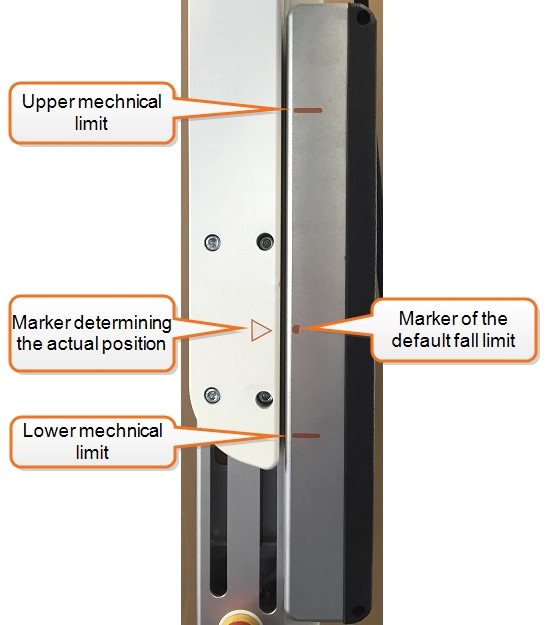 Figure 1: Default fall limit. Patients can move downward 7 cm for physiological gait or go over a step or obstacle up to 13 cm in height. |
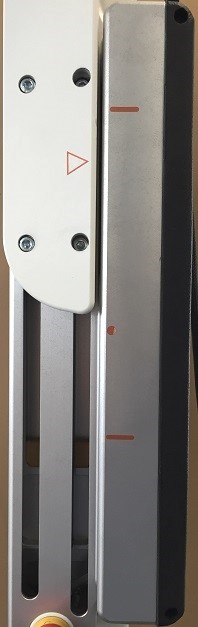 Figure 2: High fall limit. Patients can perform balance exercises and move downward up to 20 cm. |
The fall limit can be adjusted by either pressing and holding the default fall limit button or by pressing the lift button to achieve the desired position.
NOTE: If the body weight support (BWS) is set to 0, adjusting the fall limit is not possible.
Why Adjust the Fall Limit?
Adjust the fall limit to give your patient flexibility in his training depending on his therapy goal.
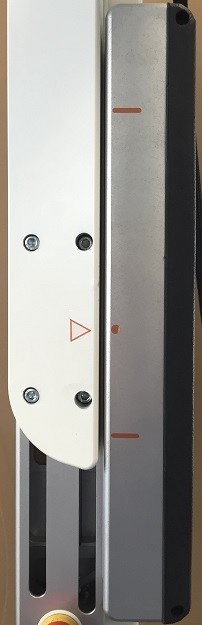
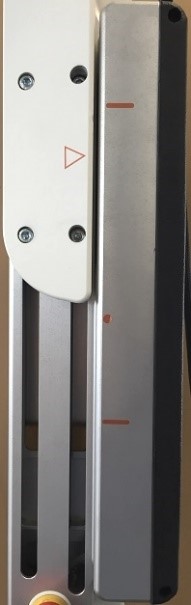
- For gait and step training, use the default fall limit (suspension carrier arrow at the dot in Figure 3). The default fall limit allows your patient to safely displace himself downward 7 cm and upward 13 cm.
 |
 |
| Figure 3: Default fall limit. Adequate for physiological gait. Press and hold the default fall limit button until the arrow is at the dot. | |
- For balance and squat training use a high fall limit (suspension carrier arrow toward the upper mechanical limit in Figure 4). The patient can perform downwards movements (like squats) of up to 20 cm. Adjust it to a position where your patient can perform the activity while still being able to recover in case he falls.
 |
 |
 |
| Figure 4: High fall limit. Adequate for balance exercises and squats. Use the lift button to adjust the fall limit to the desired height. | ||
Other Considerations
- The fall limit will be asymmetric when applying asymmetric body weight support. Adjust the fall limit so the side that is closer to the lower limit is at your desired position.
- When the upper limit is reached, the Andago will automatically switch to straight line mode. Once the suspension carriers are no longer at the upper limit, the Andago will switch back to the mode it was in.
- If the patient often reaches the lower limit during gait, adjust the fall limit manually to a higher position by pressing the down arrow
- Also check if you can help your patient by adjusting the BWS or by manually providing more trunk stability.
- If the patient reaches the lower limit when turning or walking in a curved path, adjust the fall limit manually to a higher position. Give verbal and manual feedback to your patient to keep a stable trunk posture.
How to Should I Optimize Body Weight Support for Andago Training?
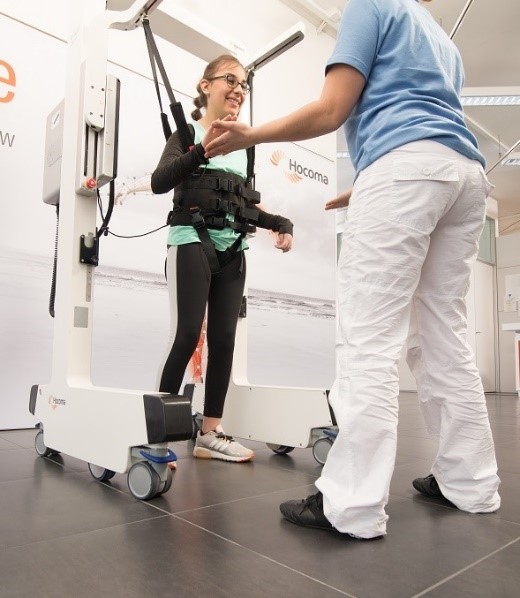
Andago Body Weight Support (BWS) unloads a portion of the patient’s weight, thus decreasing the amount of weight they need to support themselves. This weight unloading is also dynamic in that it provides constant unloading despite any vertical movement during the gait cycle and therefore ensures the most physiological unloading and afferent input.
How Much Body Weight Support is Enough?
In general there are two things to check when applying body weight support:
- Does the patient exhibit a stable standing position?
- Is the patient’s knee extending correctly during stance phase?
If possible, talk to your patient and involve them in the decision of increasing or decreasing BWS. Below we offer some tips for BWS adjustment during training.
- When adjusting the BWS symmetrically or asymmetrically, do it in small intervals (~5%) to ensure a level where the patient is able to accomplish the tasks while still being challenged. Providing too much BWS can produce changes in the gait pattern and hamper the patient’s ability to walk.
- The total amount of unloading is the sum of both BWS modules.
- Correct the fall limit (or to set it to the default value) after changing the BWS.
Things to Consider Before Adjusting Body Weight Support
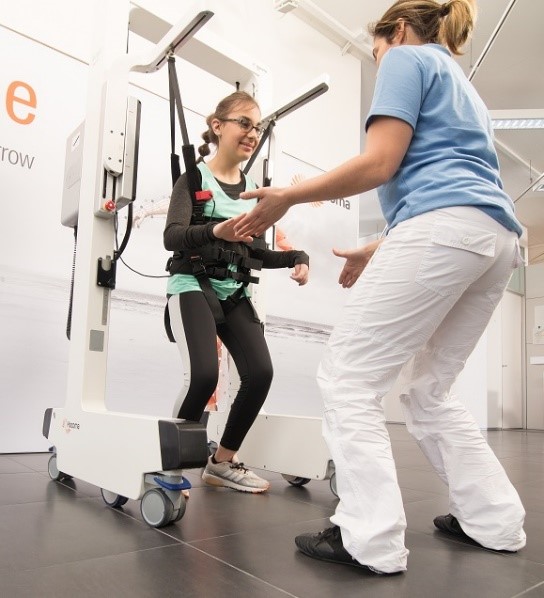
Body weight support during overground training is a great way to help patients and with the Andago it can be adjusted during training by pausing the session and using the BWS button to increase or decrease the amount of unloading. However, too much BWS can be counterproductive and training can be improved by looking at other aspects before automatically reaching for the handheld.
- Check if providing pelvis and trunk stability contributes to knee stability. If so, consider using therabands or other standard therapy material to provide stability at the pelvis. Also consider giving your patient trekking poles or your hands to avoid the patient using the handrails and to stimulate specific movements.
- Check if specific verbal indications (“keep your leg as straight as possible”) helps the patient understand what is required. Place them in an everyday environment to facilitate the transfer of skills and give explicit feedback (e.g. “walk to the corner and collect the ball”).
- Training in front of a mirror can also help the patient correct his posture and improve stability prior to gait training and gives the therapist a broader view of the patient while correcting some movements.
- Check for muscle contractures in the hips, knees or feet that might be responsible for the knee flexion and treat them separately in addition to the Andago training.
- Ask your patient to walk faster if possible to reduce stance time and therefore reduce demand on quadriceps. If this is not possible, start training static positions with the Andago and work on weight shifting and weight transfer from one leg to the other.
Should I use Symmetric or Asymmetric Body Weight Support?
Andago BWS can be applied symmetrically or asymmetrically in order to compensate differences in loading ability of the patient on both sides (e.g. for stroke patients). Increasing BWS unilaterally can help your patient by supporting pelvis stability and postural control.
- Check the pelvis lateral tilt to identify if additional unloading is required on one side of the body.
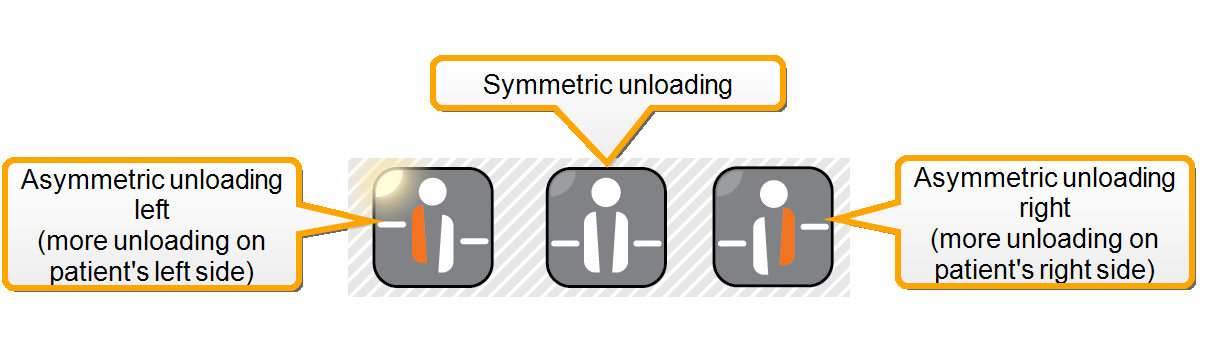
Figure 1: In order to apply BWS asymmetrically, select the side on the handheld before adjusting the amount of unloading.
Clicking the symmetric unloading button after setting asymmetric BWS will distribute the total unloading symmetrically.
Example: if you unload the right side by 15 kg and the left side by 5 kg, clicking symmetric unloading button will set both sides 10 kg unloading.
How to Add and Remove Items from the Armeo Therapy Plan?
On the therapy plan screen, you have a library on the left (holds all of the exercises and assessments) and the therapy plan on the right. From the library on the left you can choose which items you want to include in your therapy plan.
On the top of the library you have the filter options. The first box is a simple click filter where you can switch whether the list is showing exercise or assessments. The second box is a dropdown menu that sorts the exercises by therapy goal and the third box is a dropdown menu that sorts the exercises by active joints or arm segments. With these filters you can quickly narrow down the list of exercises to only those that serve the patient’s needs.
There are two ways to add items from the library to the therapy plan. You can drag and drop—that is holding the mouse button down after you’ve clicked an item and then moving it over to the therapy plan or you can use the two arrows between the library and the therapy plan. To do so, click the item you wish to add to the therapy plan and then click the right arrow. Removing items from the therapy plan is done in the exact same way. You can drag and drop back into the library or select an item from the therapy plan and then click the left arrow.
To automatically remove all items from the therapy plan you can always click the trash can arrow.
Once you have items in your therapy plan you see the scope of your plan at a glance. Here you can see how long the plan is and how many items you have. The time only counts exercises because assessments are not timed. You can also easily change the order of the items in the therapy plan. Click the item you’d like to change the order of and then click either the up or down arrow to move it up or down in order. You can also drag and drop the items within the therapy plan to change the order.
Check also the instruction video to get more information.
What is A-ROM on Armeo and When Must I Do it?
A-ROM is an assessment that measures the patient’s maximum range of motion (ROM) of the upper extremities for all degrees of freedom. A-ROM is mandatory in the initial assessment step and the software will prompt you to carry out the A-ROM assessment. In addition, you can carry out the assessment as many times as you like by adding it to the patient’s therapy plan. By running it through the therapy plan, you can also select single degrees of freedom and measure them.
A‑ROM can be carried out actively or passively: active means the movements are generated solely by the patient with no intervention by the therapist; passive means the therapist guides the arm of the patient to carry out the assessments.
On the ArmeoPower, the initial A-ROM assessment is passive. If you carry out the A-ROM assessment through the therapy plan, you can do so either passively or actively. Passive A‑ROM assessments carried out through the therapy plan overwrite the values of the initial A‑ROM assessment, which influence the workspace of the 1D-exercises. Active A‑ROM assessments carried out through the therapy plan do not overwrite any values and are used only in reporting.
On the ArmeoSpring, the A-ROM assessment is active, though you can carry out a passive A‑ROM assessment if you wish to log the passive ROM of your patient. If you carry out the A-ROM assessment through the therapy plan, you can do so either passively or actively. Active A‑ROM assessments carried out through the therapy plan overwrite the values of the initial A‑ROM assessment, which influence the workspace of the 1D-exercises. Passive A‑ROM assessments carried out through the therapy plan do not overwrite any values and are used only in reporting.
For more information please check the instructional video.
What is A-MOVE and When Must I Do it?
A-MOVE is an assessment of the patient’s capability to move and explore the reachable space around him with his arm. The software measures the position of the hand in two and three dimensions and calculates the patient’s 3D workspace. This is important because defining the workspace influences the placement of targets in the exercises and the placement of the targets relates to the difficulty of the exercises. What is more, the Armeo software will only place targets within the patient’s reach as assessed by A-MOVE; this prevents frustration and the patient from “pushing” or overcompensating to reach targets placed outside of his reachable area during the exercise.
A-MOVE is mandatory in the initial assessment step; though you can carry out the assessment as many times as you like by adding it to the patient’s therapy plan.
On the ArmeoPower, the initial A-MOVE assessment is passive, but you can choose to do it actively or passively when you access A-MOVE from the therapy plan. “Passive” means the therapist guides the arm of the patient to carry out the assessments.
On the ArmeoSpring, the A-MOVE assessment is always active. “Active” means the movements are generated solely by the patient with no intervention by the therapist. Furthermore, you have to set patient zones at the end of A-MOVE for ArmeoSpring. Please make sure to set the two zones as close as possible to the patient’s body (1. Place the hand module next to patient’s knee and press space bar, 2. Place the hand module just in front of patient’s lower abdomen and press space bar).
To get more information, please check the instruction video.
ArmeoPower Setup Video

How do I Attach and Remove the FES Cables to and from the ErigoPro?
When attaching and removing the FES cables to and from the ErigoPro and the electrodes, some details must be considered in order to guarantee the lifespan of your Erigo and your FES cables.
Attaching the FES Cables to the Erigo
- When plugging the FES cables into the FES module of your Erigo, always consider the colour code. E.g. the blue plug corresponds to the blue jack of the Erigo.
- To plug into the jack, the cable needs to face vertically upright.
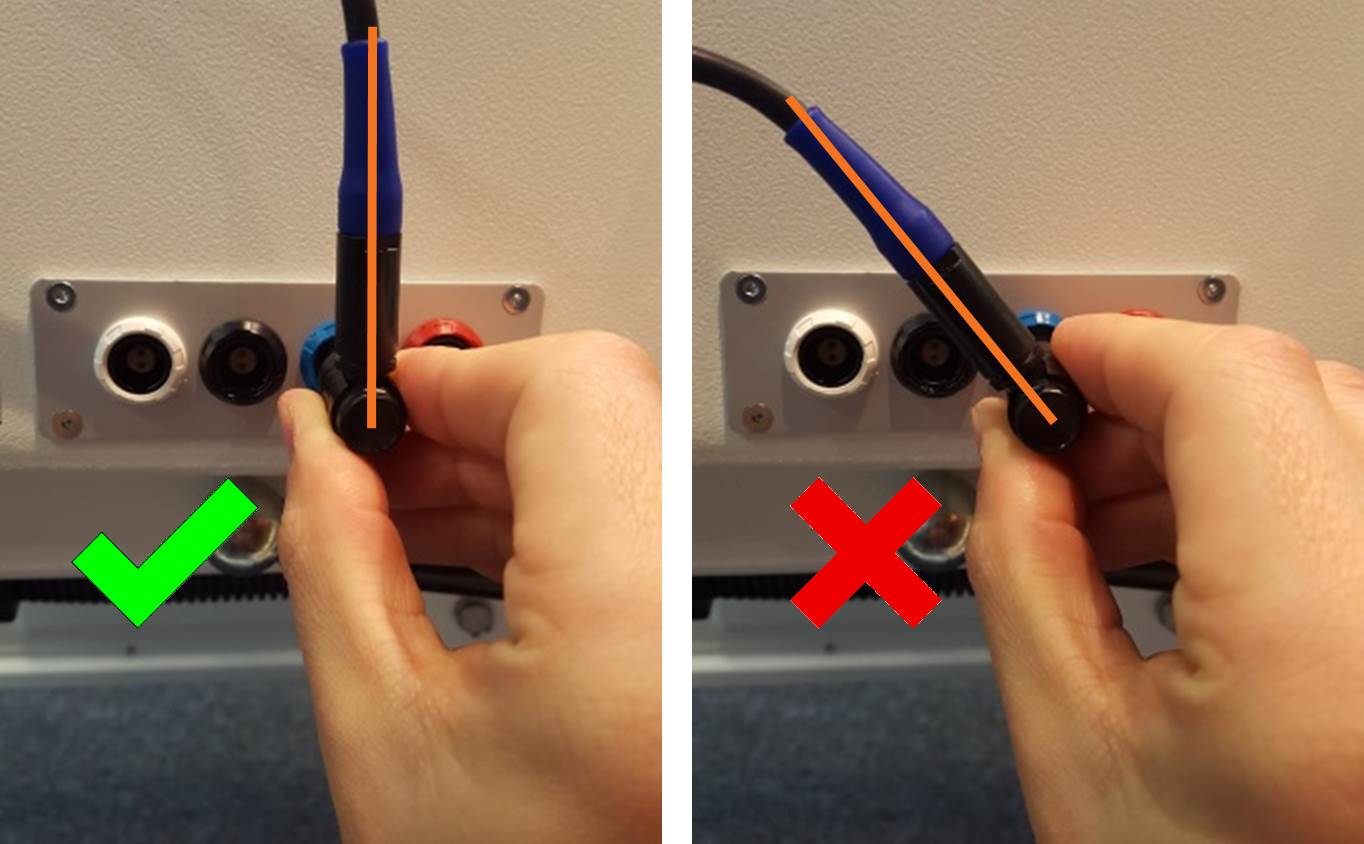
- Always hold the plug at the lower, horizontal end, not at the cable.
Removing the FES Cables from the Erigo
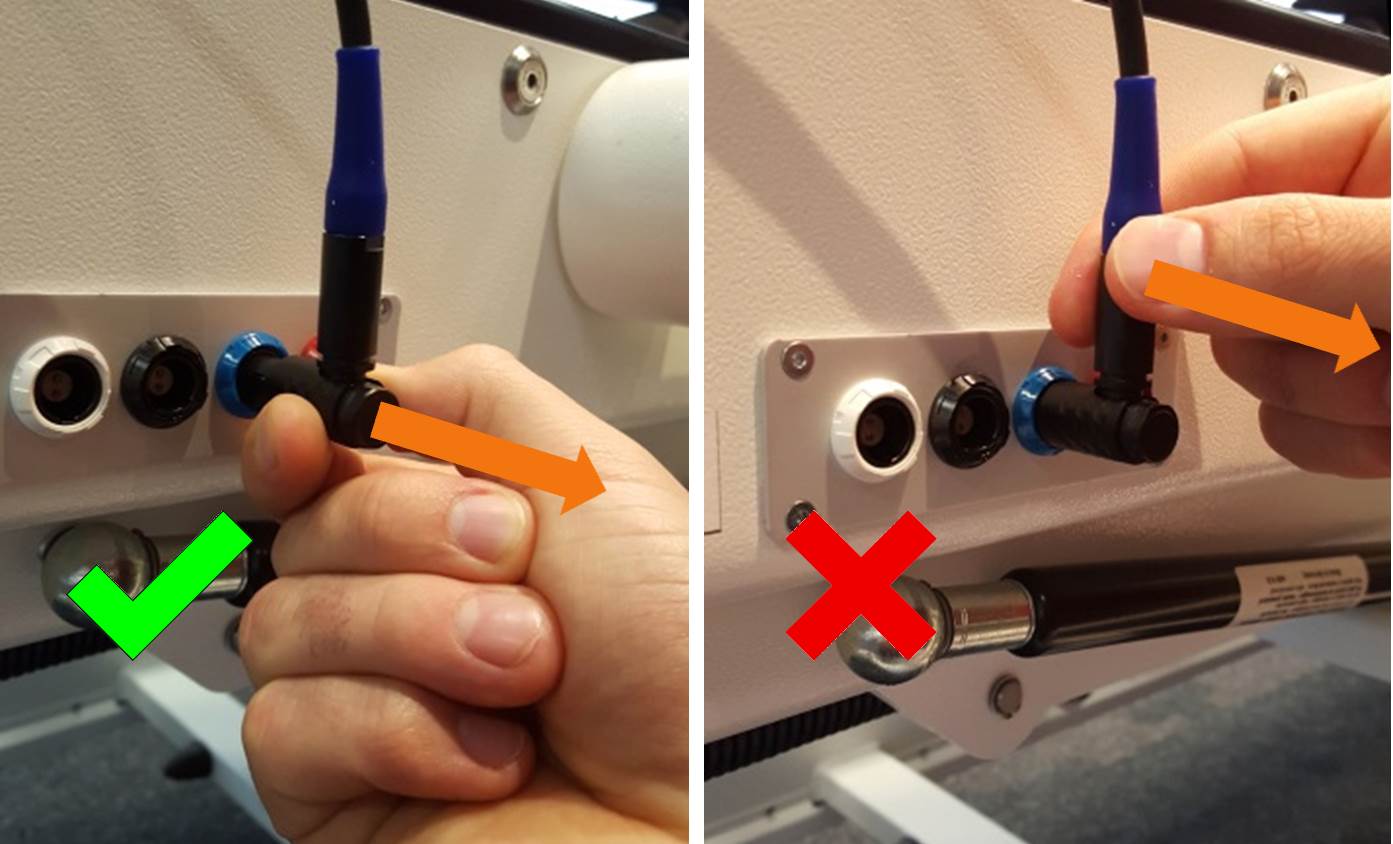
- When removing the cable from the jack on the Erigo, pull on the horizontal part of the plug. There is a spring mechanism which releases when the horizontal part of the plug is being pulled outwards straight.
- Don’t pull on the vertical part of the plug nor on the cable itself!
Removing the Electrodes from the FES Cables
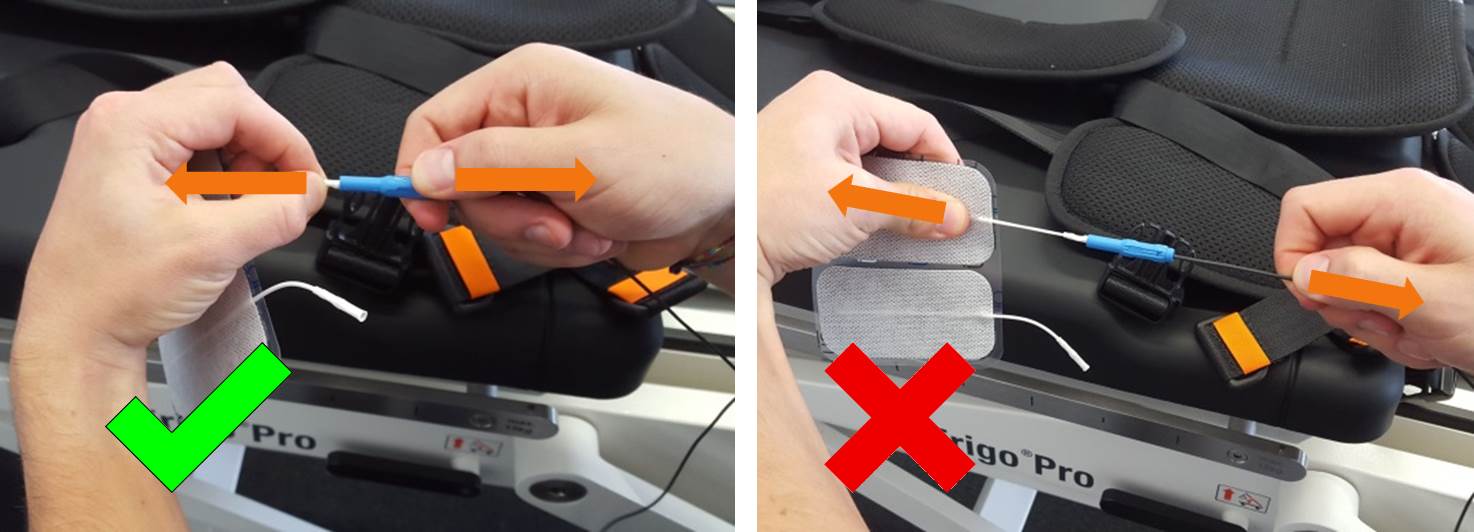
- When removing the electrode from the FES cable, pull on the plugging ends of the cables. Don’t pull on the cables!
Avoid Tension on the Cables or Plugs at Any Time
- In order to avoid damaging the FES cables or plugs, make sure that there is no tension on the cables at any time during the Erigo session, especially in the flexion phase of the patient’s stepping pattern
How Can I Improve Upper Extremity Positioning During Erigo Sessions?
Many times, therapists would like to improve upper extremity positioning during Erigo sessions in patients with lack of motor control.
The two main problems reported by clinicians are:
- Higher risk of thrombosis due to decreased venous return.
- Risk of shoulder subluxation due to the hanging position of the arm.
To prevent this problems, we recommend you to use the Erigo arm rest. Thus, the arms are in a raised position to support venous return and relieve the shoulder joint from tension.

Erigo Armrest
How can we Handle Patients with Infusions, Feeding Tubes, Catheters, Urine Bags or Venous Accesses?
There is no contraindication for conducting Erigo therapy with patients with infusions, feeding tubes, catheters, urine bags nor venous accesses. Nevertheless, we recommend you to consider the following aspects:
- Avoid pressure of any hard plastic parts on the patient to prevent injuries. Check in particular if the belts or the cuffs are fixed too tightly over these parts.
- Ensure that the tubes are not compressed and that the fluid is able to flow.
- Infusions: whenever possible, remove the infusions during the session to facilitate patient handling. We recommend to clarify with the responsible doctor if the infusion can be removed. If this is not possible, ensure that the infusions are hanging higher than the patient and that both the vein and the tube are not compressed.
- Feeding tubes: ensure that the feeding tube is closed and that it is not compressed by any belt.
- Catheters and urinal bags: flexible tubes need to be adjusted in a way, that there is no tension on the tubes (e.g. you can make a curve at the hips’ height). Don’t compress the tube in a way that the urine stops to flow. Use the catheter hook provided to safely attach urinal bags to the Erigo.
To ensure safety during the therapy session, we recommend to evaluate all possible interfaces between the Erigo and any other devices or equipment that the patient needs.
Please note that the recommendations provided above are based on feedback we received from experienced Erigo users. However, the decision whether the patient is suitable for Erigo therapy and how to handle the patient’s individual condition, lies within the clinician’s responsibility.